NavList:
A Community Devoted to the Preservation and Practice of Celestial Navigation and Other Methods of Traditional Wayfinding
From: Randall Morrow
Date: 2014 Mar 19, 07:49 -0700
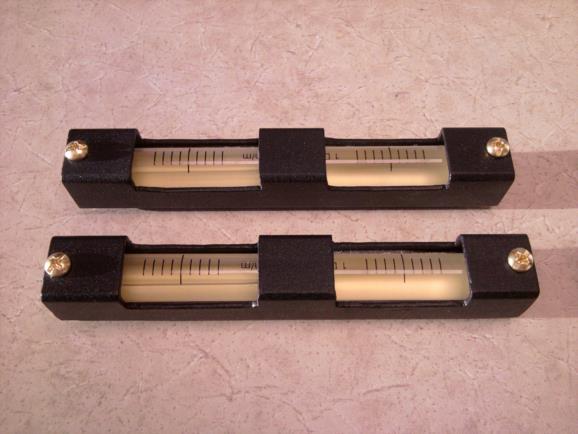
Forgive me if I have posted this before but here are step by step instructions to make metal bases for store-bought spirit level vials. They are a pleasure to use and if you make 2, can be left on the mirror surface during a round, for all but very low angle sights.
As everyone knows by now I am a fan of the mirror artificial horizon. No liquid based AH will allow you to do star and planet sights. Mercury is the sole exception but it is troublesome. I am also obsessive about getting the most accurate sights possible, and you need a very accurate level to achieve this. If the level is not precise you can’t separate your own sight errors from poor mirror leveling. It is understood that taking more sights makes you a better sight taker but large errors due to poor leveling are frustrating and discourage practice. For about $70.00 you can assemble a level sensitive to 10 seconds of arc that will give you consistent, satisfying results from your AH sights. The vial itself sells for about $50 and can be purchased from Level Developments in London. The vial base is simple to make with hand tools and the outline of the process is below.
Step by step guide to make bases for level vials
1)Buy ¾ in square mild steel tubing available at Home Depot or Lowes.
2)Cut a section 150 to 160 mm in length. The vials are 130 mm so about 160 mm should work.
3)Draw the windows for viewing the vials on the tube.
4)Make the top 4 vertical cuts with a hack saw.
5)Make the horizontal cuts with a Dremel cut-off tool.
6)The edges can be cleaned up with a smaller Dremel grinding wheel.
7)Drill the holes for the wooden end plugs at the top outside edge of each end of the tube.
8)Buy brass rod 1/8 inch square or round.
9)If round, file one side flat to make it ½ round but be sure it is FLAT on one side
10)Cut 2 short pieces the width of the flat face of your steel tubes.
11)Clamp into position with needle nose vice grips and solder in place with propane torch.
12)Be sure the brass feet are attached less than the width of your mirror surface (6”).
13)Propane torch and silver solder works well
14)After cooling, cover the brass feet with tape to prepare for painting the tubes.
15)Hang the tubes to allow for spray paint application to all exposed surfaces.
16)Buy square dowel and cut end plugs for the base.
17)After fitting the plugs in place, drill through the metal tube to “tap” the holes in the wood.
18)Remove the plugs for now.
19)Do accordion folds of bright colored paper to put in the base and support the vials.
20)Scoring the paper along drawn lines with points of a compass makes folds more accurate
21)Pad the sides of the tube with double stick foam tape, paper covering the vial side.
22)Do not pad the inside to of the tube. Let the vials press up on to the steel surface.
23)Insert the vials on top of the accordion paper and check for fit & centering.
24)Insert foam filler plugs between the ends of the vial and the wooden end plugs.
25)Screw the end plugs into place with 6/32 brass screws.
26)You may now do the process of sanding the brass feet to “calibrate” the levels.
Photos of my completed vial bases are attached. With all the materials gathered in advance you can probably turn out one of these in 2-3 hours.
----------------------------------------------------------------
NavList message boards and member settings: www.fer3.com/NavList
Members may optionally receive posts by email.
To cancel email delivery, send a message to NoMail[at]fer3.com
----------------------------------------------------------------
