NavList:
A Community Devoted to the Preservation and Practice of Celestial Navigation and Other Methods of Traditional Wayfinding
Re: Testing sextant arc error
From: Brad Morris
Date: 2017 Jan 18, 12:24 -0500
From: Brad Morris
Date: 2017 Jan 18, 12:24 -0500
Hello Greg
You wrote
using a metal sextant as the standard as Frank has described, I was able to check arc error on Ebbco's and Davis plastic sextants through 120° of arc in less than an hour.
One of the most important features of metrology is the reproducibility of results. I think you would agree that the arc error table, in order to be reliable, should be reproducible. What good would an arc error table be if it changed every time you measured it?
As the back to back sextant method only took an hour, perhaps you would show that reproducibility! Perform the measurement of arc error, again. At a few different angles checked, please take some photographs of the back to back sextant arrangement, such that it becomes obvious how it's done. Document all the raw data and provide the final result. Compare it to the previous result, such that the error in reproducibility is displayed.
I do realize it's a bit of work, but if it really only takes about an hour, it promises to be the most practical method available.
Please be sure to use the same metal sextant as before as your standard. The reason is outlined well below, but I didn't want you to miss this important point.
++++++++
As a general rule of thumb when I do metrology, the resolution of the metrology equipment should be, at a minimum, 5 times better than the accuracy requirement of the device being tested. For example, the Nikon Autocollimator has a resolution of 0.5 arc seconds, therefore, the device under test can be tested to 2.5 arc seconds of accuracy, but no better. That, however, is pressing the result. For surety, it is desired that the metrology resolution be a factor of 10. That means I am very comfortable measuring devices with a 5 arc second accuracy requirement using the Nikon Autocollimator.
As an engineering critique of Frank's novel method (and cudos to Frank for figuring this method out, it's dang good), the resolution of the metal sextant being used as the standard is 6 arc seconds (0.1'). Using the rule of thumb, we cannot expect to produce an accuracy result better than 30 arc seconds (0.5'), but to be very sure, we should only expect 60 seconds (1.0').
++++++++
Another engineering critique of the method is that the device being used as the standard may not, in fact, be a standard.
Consider a situation in which the sextant being used as a standard has some error (engraving, centering, etc. It matters not which kind). Therefore, when we use the standard sextant to determine another sextant's error, we inject the error of the standard into the device under test.
For this very reason, in formal metrology the standard against which the device is being tested should be traceable, in the US, to NIST (National Institute of Standards and Technology). That office maintains highly precise standards against which the traceable items are measured, so we can understand just how good our local standard is.
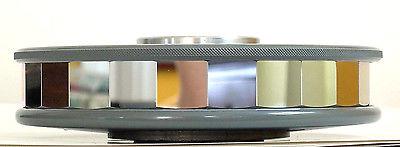
Attached, please find images of a 24 sided optical polygon. This monolithic front sided mirror has 24 facets, each ground with a precise angle to the others. There is an inspection certificate and traceability to NIST. When we measure against this optical polygon, we know our result is a good one. As a matter of curiousity, this optical polygon is currently available on eBay for a mere $1795, used.
Also find an image of a 72 sided (every 5 degrees) optical polygon. Exactly as before, the faces are ground at precise angles relative to each other. This one is bit pricier at $17,875, used.
What if you wanted even more facets? The monolithic block approach suffers from facet size. As the number of facets goes up, the size of each facet goes down or the block gets larger. Eventually, the monolithic block is enormous or the facet size tiny. The metrology solution to this arrangement is the Hirth coupling. Go to Wikipedia for images. Bill Morris just proudly showed his!
An Ultradex uses a Hirth coupling to provide many more angles than the monolithic optical polygon. The Ultradex I own has 360 equivalent facets, or one every degree. The device is traceable to NIST. There are finer Ultradex arrangements, with 1080 equivalent facets, or one every 20 arc minutes around a 360° circle! That gets a total wow from me!
In all of these traceable optical standards, it is the accuracy of the facet to facet angle that is important. The accuracy of a typical optical polygon is below 1 arc second, any facet to any other facet. For my Ultradex, the facet to facet accuracy is 0.5".
Testing with a monolithic optical polygon or Ultradex shows that we have a very precise angle to measure against, and that any deviation can most definitely be attributed to the sextant under test. Conversely, measuring sextants back to back provides no surety of the attribution of error. It may be the standard sextant or the sextant under test, or even worse, errors in both that null each other out.
Therefore, when Greg attempts to reproduce the arc error table, I strongly recommend that he use the identical metal sextant as he used last time.
Brad
.jpg.thumb.jpg)
.jpg.thumb.jpg)

