NavList:
A Community Devoted to the Preservation and Practice of Celestial Navigation and Other Methods of Traditional Wayfinding
Re: Z vs Zn
From: Peter Hakel
Date: 2012 Dec 8, 15:28 -0800
From: Paul Hirose <cfuhb-acdgw@earthlink.net>
To: NavList@fer3.com
Sent: Thursday, December 6, 2012 10:09 PM
Subject: [NavList] Re: Z vs Zn
Gary LaPook wrote:
> But before you can lay down the LOP you first have to lay out the intercept. So you can set the plotter so that you count degrees from a parallel to plot the azimuth and then mark off the intercept along this azimuth line then place the plotter on the azimuth line so that it is perpendicular at the intercept and draw the LOP.
With the right tools you don't really need to do all that. The LOP can be plotted directly. I use a square protractor and a graduated straightedge, though the general idea should be adaptable to other drawing instruments.
Place the square protractor on a meridian and orient it to the Z of the body. Move the protractor to put one of its sides (one of the two which lie parallel with the eventual LOP) on the assumed position, without disturbing the orientation of the protractor. (This is easily accomplished by sliding it along the straightedge.) After placing one edge on the AP, slide the protractor toward or away from the body the appropriate distance, again using the straightedge to maintain orientation. Draw the LOP.
Although my protractor is transparent and has a grid with 5 mm squares, I find this grid useless for applying the intercept (or anything else). Instead, I use the mm scale on the straightedge. And since the protractor is only 5 inches on a side, I usually use the straightedge to draw the LOP.
The square protractor I own has been in the Celestaire catalog for many years. I have only used the 5 inch model. It is accurate and robust, and seems the right size for close quarters. However, I think it would be more useful with millimeter scales on all sides and the compass rose on the inside.
--
From: Peter Hakel
Date: 2012 Dec 8, 15:28 -0800
The recent addition of a protractor makes the T-Plotter a fully self-contained tool for plotting celestial LOPs. Having drawn one's own plotting sheet as described by Greg Rudzinski:
http://fer3.com/arc/m2.aspx/Plotting-Sheet-Construction-T-Plotter-Rudzinski-nov-2012-g21260
LOPs can be plotted as follows:
http://www.youtube.com/watch?v=ZziI84Sbp74
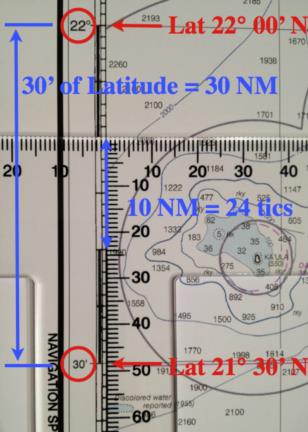
I should point out that even these graduated T-Plotters are not limited to the scale of 20 nautical miles per inch (inspired by the VP-OS plotting sheets). As is shown in the attached image, it is always possible to overlay the T-Plotter along the latitude scale of any chart and read off the number of tics equivalent to the relevant distance given the chart's scale.
Peter Hakel
From: Paul Hirose <cfuhb-acdgw@earthlink.net>
To: NavList@fer3.com
Sent: Thursday, December 6, 2012 10:09 PM
Subject: [NavList] Re: Z vs Zn
Gary LaPook wrote:
> But before you can lay down the LOP you first have to lay out the intercept. So you can set the plotter so that you count degrees from a parallel to plot the azimuth and then mark off the intercept along this azimuth line then place the plotter on the azimuth line so that it is perpendicular at the intercept and draw the LOP.
With the right tools you don't really need to do all that. The LOP can be plotted directly. I use a square protractor and a graduated straightedge, though the general idea should be adaptable to other drawing instruments.
Place the square protractor on a meridian and orient it to the Z of the body. Move the protractor to put one of its sides (one of the two which lie parallel with the eventual LOP) on the assumed position, without disturbing the orientation of the protractor. (This is easily accomplished by sliding it along the straightedge.) After placing one edge on the AP, slide the protractor toward or away from the body the appropriate distance, again using the straightedge to maintain orientation. Draw the LOP.
Although my protractor is transparent and has a grid with 5 mm squares, I find this grid useless for applying the intercept (or anything else). Instead, I use the mm scale on the straightedge. And since the protractor is only 5 inches on a side, I usually use the straightedge to draw the LOP.
The square protractor I own has been in the Celestaire catalog for many years. I have only used the 5 inch model. It is accurate and robust, and seems the right size for close quarters. However, I think it would be more useful with millimeter scales on all sides and the compass rose on the inside.
--
